


 About Us
 2023-10-25
4、Quality Check
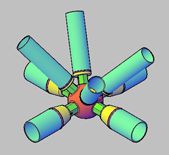
After the space frame has assembled several strip units, stop the assembly; start to check the installation quality of the space frame: the space frame size and diagonal of the lower chord, the space frame size and diagonal of the upper chord, the vertical length of the space frame, the horizontal length, the space frame adjust the height before each temporary support frame is removed. Check the overall deflection of the space frame, and control the deflection value by adjusting the upper chord size. After the adjustment, retighten the high-strength bolts on the ball joints one by one with a matching wrench or pipe wrench, and then tighten and lock the small positioning bolts on the sleeves at both ends of the rod. After the inspection, remove the temporary supports step by step, and pay attention to synchronization to prevent stress concentration from causing local deformation of the space frame or local mesh deformation.
5、Space frame sliding
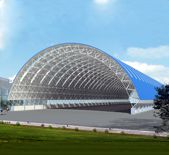
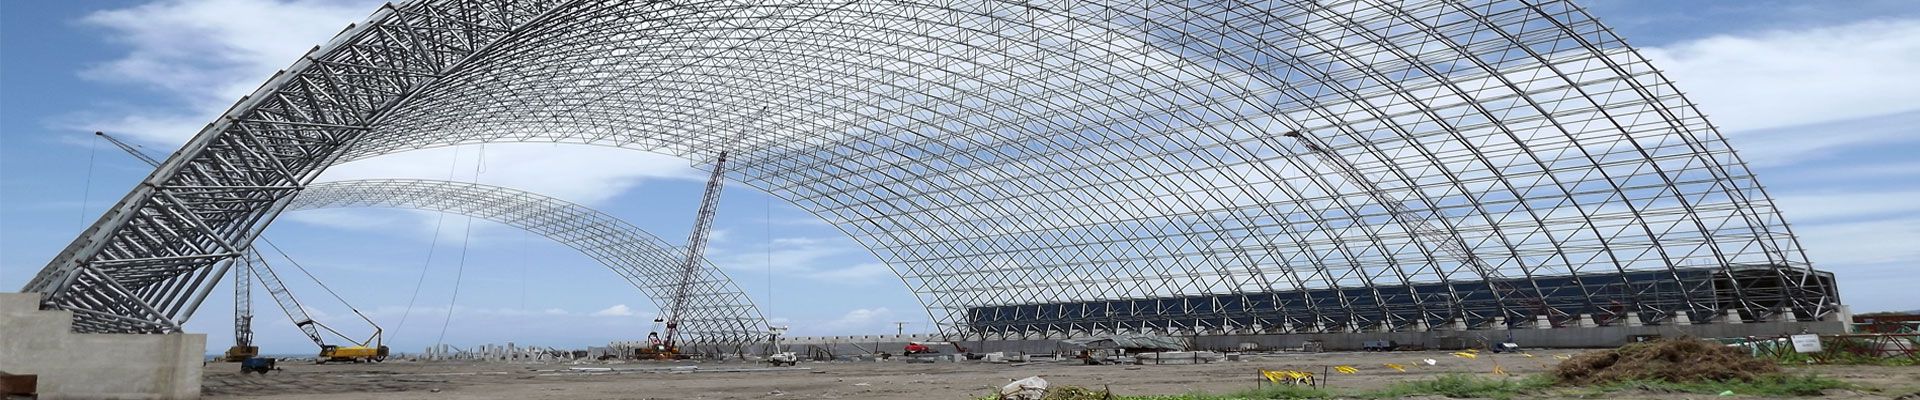
The principle of the sliding process is mainly to use the sliding system to use external force to overcome the friction generated by the self-weight of the space frame and the track when sliding, and to continuously move the assembled space frame from the operating platform to the other end. For ease of control, it is advisable to manually pull the gourd to apply external force to slide the space frame forward as a whole. The sliding system of the space frame consists of: two 10t hoists, two 5t hoists, a wire rope with a diameter of 18.5mm, a single-wheel sliding trolley, a jack, and a 3mm thick flat steel plate. The single-wheel sliding trolley is customized for the manufacturer: the wheel has a diameter of Φ50mm and a width of 30mm, and is fixed on the bottom of a steel plate with a thickness of 16mm and the same size as the support bottom plates on both sides of the space frame with bearings. Operators are divided into 2 groups according to the A-axis and B-axis to prepare for sliding: set up a sliding trolley every 6m from the end, that is, every 2 supports, and then determine the support to install the sliding trolley and make Then use the same number of jacks to withstand the upper chord on the side of the support where the sliding trolley is to be installed, and shake the operating lever at a constant speed to make the support hang in the air synchronously. When the bottom plate of the support is 80mm to 90mm away from the beam surface, stop Shake; then, place a 150mm wide and 3mm thick flat steel plate on the part where the beam surface is not smooth enough to reduce the resistance during sliding; then use 4 M20×65 bolts to connect the sliding trolley to the support bottom plate Fix them together (connected with bolts, easy to disassemble and turn around); then loosen the jack, let the sliding trolley descend, and the wheels contact the iron plate or concrete surface; then A and B on the 7th axis (2# machine is on the 13th axis) A steel wire rope with a diameter of 18.5mm is fastened to the shaft frame column respectively (as the space frame slides forward, the position of the steel wire rope should also be adjusted forward continuously), and at the same time, fasten the next bearing ball on the end support The steel wire rope of the same size (it should not be tied to the end support, because there are few rods at the ball joint, and it is easy to deform after being stressed), and the two steel wire ropes are connected by a 10T hoist; to ensure that the space frame slides smoothly, the sliding To avoid torsion phenomenon during the shifting process, install a 5t limit hoist on the rear 10-axis (or 17-axis) A and B axis columns respectively to limit the free sliding of the space frame, so that the space frame is always in a controlled state . In order to ensure that the upper chords on both sides of the A and B shafts are not damaged during sliding, a Φ48×3.5mm steel pipe is bound to the upper chords at these parts before sliding to strengthen the rigidity of the rods and reduce the size of the rods. Deformation of parts during force movement. When sliding, the operators are divided into 4 groups, with 4 people in each group on both sides of the A and B axes that slide forward, 1 person in each of the 2 groups that release the hoist at the rear end, 1 person in command, and 1 person in front and rear monitoring; Before moving, the commander should make a technical disclosure to all operators involved in the sliding. When it is ready, start to slide. The operator operates according to the gestures and whistle of the commander. The team members should cooperate closely, pull at a uniform speed and slowly, and do not be impatient. Stop sliding when several strip units (about 15m) have been slid out, and tighten the 4 hoists to ensure that the space frame cannot slide freely, and the sliding trolley does not need to be taken out. After all the space frames have slid in place, they can be removed together . The assembly and sliding of the space frame requires the spirit of group cooperation. The operators must obey the command and arrangement, so as to obey the order and stop when there is a prohibition, so as to ensure the smooth and safe installation and sliding of the space frame. Before each slip, the slip system must be checked, especially the integrity of the steel wire rope. When damage is found, it must be replaced in time, and the operation of the equipment with a disease is prohibited. Then, continue to assemble backwards in the same way from the tail of the front space frame strip unit. Then follow the same construction procedures and so on until the entire space frame is assembled and slipped into place. After the slide is in place, recheck the centerline of the support and the centerline of the space frame beam, the center of the support and the axis. The cumulative error of the size during installation should be dispersed to both sides to prevent the correct position of one side of the support and the deviation of the other side is too big. After adjustment, still according to the principle of setting one jack at one sliding trolley, remove the sliding system on each side synchronously successively. After assembling the last several strip units on the operating platform, it is also necessary to check and adjust the height and deflection of the space frame.
6、check fixed
After rechecking the overall size, height, deflection, and axis offset of the space frame to meet the requirements, the support bottom plate and the embedded parts of the space frame beam surface shall be welded and fixed. The length and thickness of the weld shall meet the design requirements and relevant specifications. Finally, clean up the materials and tools used in the installation process, and remove the operating platform; that is, complete the installation of the entire space frame.


