


 About Us
 2023-09-12
4、construction points
4.1、Construction preparation
Prepare the space frame jacking construction plan, determine the position of the space frame support points, and assemble and lift in stages. The space frame structure should be further designed before processing the structural parts. Before construction, carry out computer construction simulations such as structural design, space frame structural analysis and design, and mechanical model simulation to analyze the force of the rods at different stages of jacking, and accurately find out the specific parts of the overstressed rods during the jacking process. The rods are reinforced in advance with angle steel clinging to the wall to avoid harmful deformation of the rods. The support points of the jacking frame body are checked according to the reaction force values at each point to check whether the foundation bearing capacity meets the requirements. If the requirements of the jacking reaction force are not met, the reinforcement treatment of the foundation of the jacking point should be completed in advance.
4.2、Positioning and setting out
Before the starting frame is assembled, perform positioning and setting out, use a total station to determine the position of the starting frame in the center of the space frame, and make the bottom string balls of the first two or three grids must be on its projection line.
4.3、Assembling the starting frame and installing the jacking frame
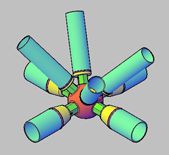
Assembling the starting frame, connect the temporary support points with the rods of the space frame and the bolt balls, place them under the bottom string balls, and mark on the bolt balls of the temporary support points. Check the error between the landing point of the temporary support point and the design axis, connect the lower chord, web and upper chord after meeting the requirements, and support it on the ground, install a jacking frame on the upper chord of the starting space frame, and place the main hydraulic cylinder on the jacking In the middle of the support frame, the upper and lower sides of the oil cylinder are respectively connected to the upper and lower brackets by bolts. Sensors are installed on the top of the jacking frame. After the installation of the space frame between the temporary support points is completed, check the coordinates of the space frame ball nodes, and then proceed to the next step after confirming that they are correct. One-stage assembly jacking. The starting frame node is shown in Figure 2.

Figure 2 Schematic diagram of starting frame nodes
4.4、The first space frame continuous assembly
According to the assembly and jacking stage divided by the construction plan, the first continuous assembly of the space frame is carried out, and the continuous assembly is extended symmetrically grid by grid along the radial direction of the major axis to both sides and the major axis direction. The lower string is assembled first, and then the upper string is assembled.
4.5、Space frame pre-jacking
After the first continuous assembly of the space frame is completed, pre-jacking is carried out before the space frame is jacked up, so that the force on each cylinder is basically the same, and the space frame is basically separated from the ground foundation, and the jacking control system is compared with the actual situation for 2 hours of static observation. The formal jacking will be carried out after there is no large deviation in the observation.
4.6、The first space frame jacking up, installation support standard section
The process of jacking up the height of a supporting standard joint is divided into several sections. The jacking height of each section is based on the principle of convenient observation and construction. The first few sections are lifted once for observation and deviation correction, and the last section is jacked in place. When the piston of the main oil cylinder of the supporting frame body is lifted up, the lower bracket is stressed. When the piston rod of the oil cylinder is fully extended, add a standard section of the supporting frame, fix it with the lower frame body with bolts, and the piston rod of the oil cylinder retracts. The upper bracket is stressed, and when the piston rod of the oil cylinder is fully retracted, the lower bracket is retracted together with the base of the oil cylinder to the stressed steel beam at the top of the previous supporting standard section. Follow this process to gradually increase the jacking height.
4.7、The Nth space frame continuous assembly and jacking up
The Nth space frame is assembled continuously. According to the stages of the construction plan, the space frame is extended and assembled symmetrically grid by grid along the radius direction of the major axis of the ellipse to both sides and the direction of the major axis. assembled. Mark the bolt balls of all space frame jacking points; select and determine the jacking ball points at each stage according to the density relationship of space frame rods, the size of the jacking support frame, the condition of the bolt ball joints, etc., and are consistent with the construction simulation to ensure When changing the jacking ball point, the construction stress should not exceed the compressive limit of the rod. During the Nth jacking, it is necessary to increase and change the position of support points according to the progress of space frame assembly, and the replacement of support points at each stage should be carried out in strict accordance with safety control measures (Figure 3).

Figure 3 Schematic diagram of continued jacking points
4.8、Installation of sliding bearings, welding balls and embedded rods
(1) For the installation of the embedded parts of the sliding support, first place the position line and elevation line of each embedded part on the bound steel bar according to the on-site axis space frame and the elevation control space frame. Use a crane to put the embedded parts in place, adjust them according to the placed control lines, and use a level to adjust the flatness and verticality of the embedded parts. After the adjustment is completed, use steel bars to weld and fix the embedded parts and the bound structural secondary bars together.
(2) The welding installation of the support welding ball starts from the middle part of the short axis of the space frame, and the middle part of the long axis closes. After all the loads of the roof are added to the space frame, four groups of welders are set up to weld the support symmetrically to avoid stress during the welding process concentrated.
(3) After jacking up to the predetermined height, install the rear embedded rod. One end of the space frame rear embedded rod is connected with a high-strength bolt to the ball joint, and the other end is welded with a hollow ball joint. The embedded rod is first connected to the ball end of the bolt, and the high-strength bolt The length of the thread screwed into the bolt ball is not less than 1.0d, and then the welded ball end is connected. The welding inspection should strictly follow the requirements of the welding acceptance specification. Transparent butt weld connection, the weld quality grade is first grade; all weld joints shall be inspected for flaw detection.


